Showing posts with label baking. Show all posts

Friday, 31 January 2014

Lemon Polenta Biscuits


Well we made it to February, well done everyone! What got me through the last week of January was these fabulous lemon cookies, made a on exceedingly dreary Sunday afternoon. Once they were cooled we curled up on the sofa with steaming cups of tea and dunked these sunshiney cookies (well I did, I'm the dunker of this household). For the next few days they provided a lovely accompaniment to our after work cups of tea.

I spotted the lovely Emma's tweet about her lemon polenta biscuit recipe, and immediately got up and surveyed the kitchen cupboards to see if we had the right ingredients in. Everything except the almonds, so I did a bit of searching and came up with this recipe, halfway between Emma's and this one on Taste.au.

These are forgiving biscuits, quick to make and if your dough starts to get a bit soft, pop in the fridge for a bit and then bring it back out again to separate into balls.

Lemon Polenta Biscuits
makes 12 - 15

100g butter, softened
100g caster sugar
2 egg yolks
grated zest of 2 lemons, plus juice of 1/2 lemon
150g plain flour
75g polenta

1. Put your butter and sugar in a large bowl, and cream together. Or if you are fancypants (me) pop them both in your stand mixer and mix for a couple of minutes with the beater.
2. Add in an egg yolk at a time and keep beating.
3. Add in the lemon zest and juice, flour and polenta. Mix with a spoon (if you're using a mixer it's best to switch to a spoon now), and then knead with your hands briefly to allow it to come together.
4. Refrigerate for about 15 minutes, then separate the dough into 12 - 15 balls around the size of a walnut. Preheat your oven to 200c
5. Arrange on a lined baking tray, and then squish with a wet fork to flatten.
6. Bake for 12 minutes or until lightly brown on the edges
7. Leave to cool and then remove from your tray, and into your mouth.

They keep for about 5 days in an airtight container.


News! I'm holding another food event. My long awaited Gujarati Supperclub is on the 22nd February in Cambridgeshire. Find out more and book one of the last few spaces here: www.foodmela.co.uk 


Pin It

Sunday, 15 September 2013

Banana Cardamom Bread


I've made this cakey bread three times now. Something about this recipe required me to become a little obsessed with getting it just right so for the last 3 weekends we've had a banana bread of varying quality in the cake tin.

This is a cakey banana bread, it still has the crumb that a good sponge should, it isn't too dense, but it holds up well and can be spread with jam. The first two versions I made were much too dense - 2 bananas or 4 bananas is too much. 1 banana is just right! Version one had too little cardamom in it (2 pods), version two had too many (6 pods). The magic version had just one banana, and then the crushed seeds of 4 cardamom pods.


I only had bread flour in, which worked fine in this bread, and it is a bread after all. This makes one tall loaf that will cut in to lots of slices for breakfast, lunch and dinner.

1 banana - approx 100g
100g softened unsalted butter
200g caster sugar
pinch of salt
3 eggs
1 tsp vanilla extract
crushed seeds of 4 cardamom pods
1 tsp baking powder
250g bread flour


Heat your oven to gas mark 3 / fan 170 / electric 180. Mash the banana in a large bowl and then add the butter - mix together well and then stir in the sugar and salt. Add in the eggs one at a time, mixing in with each addition. Then add in the vanilla and crushed seeds of cardamom. Sift in your flour and baking powder and fold in carefully.

Bake for around 40 minutes on the middle shelf til golden brown on top and cooked throughout. Leave to cool before removing from the tin and slicing.

You can eat this for breakfast, I reckon, it is totally fine. And I did.

Pin It

Monday, 26 August 2013

Sourdough Baguettes


I'm having a go at sourdough again. It's a funny thing - something that seems a little scary, looks a little weird and smells quite strong. But it makes amazing bread, like nothing you can buy (except from lovely bakeries) and it feels like such an achievement to make yourself.


I made my own starter a few years ago but it didn't go so well, it came out smelling a bit like paint and the bread I made also had a very chemical taste. Fellow Cambridge food blogger Ivana offered up some sourdough on Twitter so I thought it was about time to have another go - plus maybe an already active and healthy starter was the way to go this time.


This starter is very low maintenance, it stayed in it's jar for a good 5 days before I started to prepare it for baking - I think you can leave it along for up to a week between feeds. It becomes more of a pet when you are preparing for a bake, requiring a feed every 12 hours.

For the actual dough it takes about a day of going in and out of the kitchen to knead, rest, knead again, prove etc. Ivana gave me a Hilary Cacchia recipe which I'm not sure if I am allowed to reproduce but this Dan Lepard recipe looks similar. I used 150g starter, 225 very strong white bread flour, 5g salt and 100ml room temperature water.


It's then a case of kneading for a few minutes, leaving for 30 minutes. Then a process of kneading for 20 seconds, leaving for 10, then repeating 3 times. Then leave to double in size. Then dividing the dough, leaving for 15, shaping into baguettes and placing on the baking tray. Leaving to double in size. Then bake for about 15 minutes in a hot oven til golden.


I think the crumb could have been a little more 'open' but overall the bread was fantastic. A beautiful crispy top and soft fluffy interior. I sliced them lengthways and we had them simply with fried garlic mushrooms and a little parmesan on top.


I've still got plenty of starter left, sitting happily in my fridge, so hopefully there will be more recipes coming here soon! Watch this space :)

Pin It

Tuesday, 6 August 2013

Nankhatai - Indian Spiced Biscuits


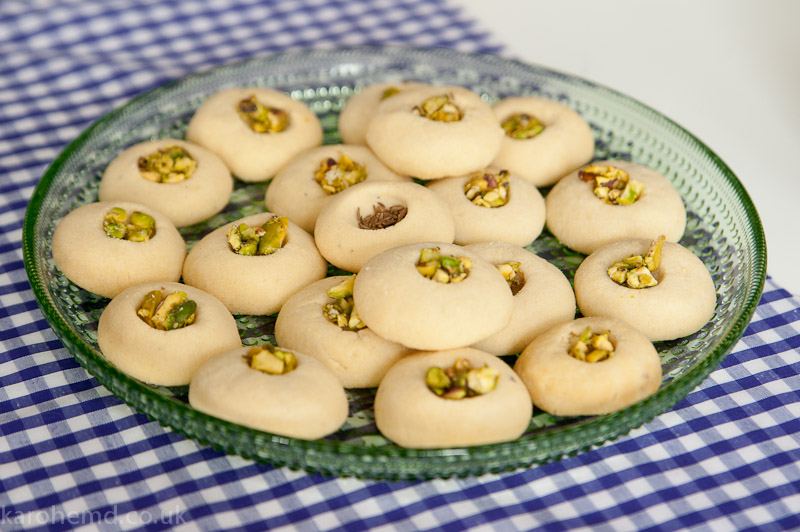
One of my favourite recipes from my Indian Afternoon Tea last weekend was Nankhatai - they are the perfect cup of tea biscuits and are very easy to make. You can customise them with different spices and once they are baked, different toppings.

Nankhatai can be found in most Indian bakeries and sweetmarts, they usually bake with a cracked top but I couldn't achieve this - I'm not sure what the technique is - but they tasted just as good!

Nankhatai are eggless biscuits, a lot of Indians don't eat eggs for religious reasons which is why they are such a popular baked good in India. They contain a pleasingly large amount of butter, which gives them their melting soft texture and makes them very moreish.
My biscuits are flavoured with cardamom and saffron and I topped them with chopped pistachios (bound with a little runny honey to stop them falling out), and some of them cumin seeds, which I love with sweet things.

Nankhatai - makes about 30 biscuits (easily halved)

100g softened butter
100g icing sugar
1/2 teaspoon baking powder
Pinch of saffron
3 pods worth of black cardamom seeds - ground finely
250g plain flour
20g gram flour / chickpea flour
30g coarse semolina
Pistachios or other nuts to decorate.

Preheat your oven 160c / gas mark 4
Cream together the butter and sugar til smooth.
Add in your spices and baking powder and stir briefly
Sift in your flours, mix with a wooden spoon first and then as it comes together use your hands to form a dough - it will be quite soft.

Line or grease a couple of large baking trays and then make 1 inch balls out of the dough and place on the sheet. They should be fully round, don't flatten otherwise you won't get lovely rounded biscuits at the end.

Once you've got all the dough balls ready press into the middle to create a small hole, being careful not to flatten them. I used a velun (a rolling pin for rotli) - you could use the end of a tablespoon very carefully to do this.

Bake for 15 minutes til they are only just a little golden on the edges. Remove from the oven and then add your pistachios or other choice of topping - other nuts work well, as does desiccated coconut, or when they are cool you can add chopped chocolate.

They keep very well for a few days in an airtight tin stored at room temperature. I recommend you have them with a cup of masala chai!

Pin It

Wednesday, 24 July 2013

Peach Clafoutis & A Week in Limousin


We spent a week in Limousin last week, a much needed relaxing break after a few crazy months of working too much, making a lot of jewellery and generally not finding a lot of time to sit still. We went to the land of clafoutis, madeleines, pottery and cows. Limousin is very sleepy - lots of small towns and even smaller villages and hamlets tucked in to the rolling hills and next to winding streams and rivers.


We ate reasonably well, being with a vegetarian in France is a little tough and we planned to eat more in the gite (for budget reasons too) so we made good use of the local shops for this. We ate a lot of cheese and bread, as was my target and expectation. There is an excellent bakery in Saint Yrieux la Perche called Tartine which I would highly recommend - otherwise most other places you'll go will be great anyway!


I was keen to get back in the kitchen, and spend some time recreating local dishes and French classics. We had tartiflette one evening (minus the bacon for the veggie) and I tried my hand at the local speciality of clafoutis. Traditionally it is made with cherries, but I fancied peaches after we bought some gorgeous ones at the local supermarket.


I didn't realise just how easy clafoutis would be! I had pretty limited kitchen equipment - no scales, a tiny whisk and a casserole was to be my mixing bowl. I baked the clafoutis in a gorgeous old metal tart tin and it didn't stick!

I went for this adaption of a Julia Child recipe - an American recipe (mon dieu!) because I could estimate about what a cup would be, and use the teacups we had in the house. It worked out just fine, the only change was that I added 1 tsp of baking powder to ensure puffiness.

I sliced peaches with the skins still on and arranged them artfully(ish) on the top after one layer of the batter had cooked in the oven for a few minutes - this ensures the fruit doesn't sink. Once the second layer was baked I sprinkled the still warm clafoutis with sugar and left to cool slightly.

Limousin was a very lovely holiday destination, if a little quiet, but if you want to force yourself to do little then it is a great place to unwind, eat too much bread and cheese. :)

Pin It

Tuesday, 7 May 2013

Honey Sesame Dream Cake


I had a dream about this cake, scented with toasted sesame oil with the crunch of sesame seeds and a touch of citrus, and maybe some spice. I am aware this is totally ridiculous/obsessive but I am pretty sure cake is a good thing to be obsessive about, good cake that is. This is why dream made it into the title - and of course it is dreamy to eat!

This cake is flavoured with toasted sesame oil, toasted sesame seeds and then glazed with pure honey, with some spices, and topped with more toasted sesame seeds for crunch and prettiness.


I whisked my eggs to get some air into the batter, and also used yogurt for a creamier softer sponge. I used Yeo Valley Lemon Yogurt, but you could use plain yoghurt with some lemon curd whisked in, or some zest. My chicken eggs were from a local farm so were super yellow, hence the bright sponge!


Honey Sesame Dream Cake
Makes one round 20cm cake

150g butter, softened
150g caster sugar

100g plain or lemon flavoured yogurt
1 tsp vanilla extract
3 tsp toasted sesame oil
200g plain flour
1 tsp baking powder
pinch of salt
2 medium eggs
50g toasted sesame seeds

For the topping:
1 -2 tablespoons of toasted sesame seeds
5-6 tablespoons of runny honey
1/2 teaspoon cinnamon
1/2 teaspoon of ground ginger

Preheat oven to 180c / 160c fan
Cream together butter and sugar til creamy. Then add in the yoghurt, vanilla and oil.
Fold in your flour, baking powder, salt and sesame seeds.
Whisk your eggs in a separate bowl til airy.
Gently fold in the eggs to the cake mixture.
Spoon mixture into a lined/greased 20cm cake tin and bake for 30 - 40 minutes til cooked through.
Leave to cool for 5-10 minutes then remove from the cake tin.

Mix the spices with the honey, if it is a little too thick to spread add a tiny bit of hot water.
Spread over the cake with a pastry brush (silicone ones are best for sticky honey!)
Sprinkle over sesame seeds generously.

Cut it, eat it, be happy, and hopefully dream about it later on. :)

my giraffe socks (great aren't they?) sneaked into the photo, so here is an outtake for you...

Pin It

Sunday, 7 April 2013

Hot Cross Buns


Homemade hot cross buns are one of the best things you'll make and are nothing like the flabby supermarket ones. I shouldn't have left it so long until I made them again, the last time I baked them was 4 Easters ago

I watched the Great British Bake Off Easter Masterclass a few days before the Easter weekend and because I am very easily influenced I decided that I absolutely had to revisit them and bake them over the long weekend.

Incidentally, I was going to name this blog post "Paul Hollywood's Buns'' and I wondered if this would drive lots of traffic to my blog, but I couldn't do it. I don't get the Paul Hollywood thing, is he a dish? Maybe I am a little young to see it (ha). Anyway back to the buns, hot cross ones.


Yes it is not Easter anymore, but I made these over the Easter weekend and they were lovely, so I decided to tell you about them. And you know, it is ok to make them after Easter, Jesus won't be mad. And it might make a nice change from the mounds chocolate eggs you have in your kitchen.


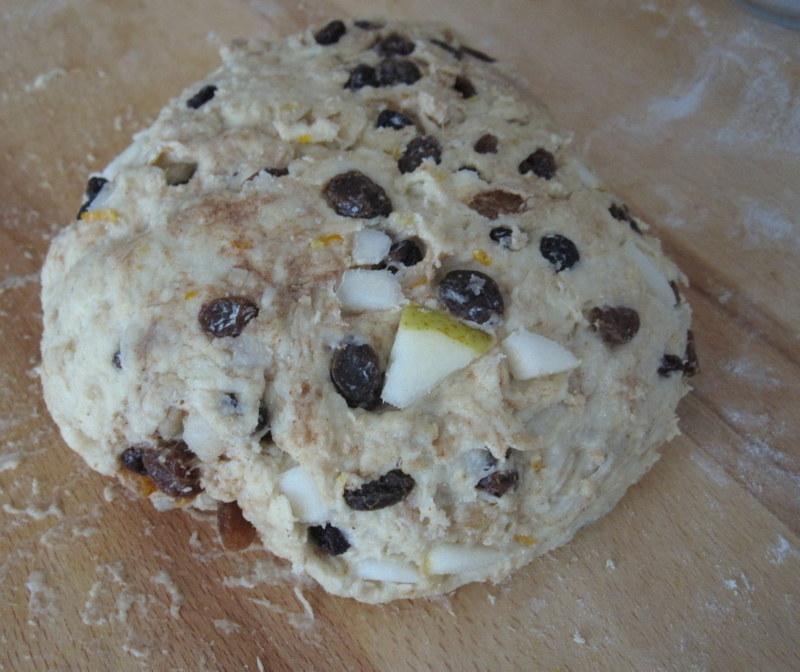
A few notes on the recipe, I used only mixed fruit instead of mixed peel & sultanas, I had a pear so I used that instead of an apple - both worked fine. I think the fruit would benefit from being soaked before baking, maybe in some tea, to stop it blackening whilst baking, and for a little more juiciness.
Also, I used honey thinned with a bit of water instead of apricot jam, to glaze, which worked a treat.

Hot Cross Buns - recipe by Paul Hollywood

300ml milk
500g strong white flour
75g caster sugar
1tsp salt
1 sachet (7g) fast action yeast
50g butter, softened
1 egg
125g mixed fruit
1 pear (or apple) cored and chopped (no need to peel)
zest of 1 orange
1tsp cinnamon

Extra flour and water for piping crosses
1tbsp of honey, for glazing

1. Boil the milk and then leave to cool until lukewarm
2. Mix flour, sugar, salt, yeast (keep salt and yeast apart on different sides of the bowl, so as not to kill the yeast), egg and softened cubed butter in a bowl. Slowly add cooled milk, mixing at first with a fork and then your hands to form a soft and sticky dough
3. Add orange zest, pear/apple, mixed fruit and cinnamon. Knead for about 5 minutes to form a soft springy dough.
4. Leave the dough in a warm place, to prove, in an oiled bowl covered with oiled cling film, for one hour, til doubled in size.
5. When proved place the dough back onto a lightly floured surface and divide into 12 even pieces. Transfer to a baking tray lined with greaseproof paper. Cover again with oiled cling film and and leave to prove for another hour. The buns can be close together as it is ok if they stick together during baking.
6. Heat oven to 225c / Gas mark 7.
7. For the crosses, put 5 tablespoons of flour in a bowl and then slowly add cold water to form a thick paste. Put into a piping bag with a narrow nozzle (I used a wider one and it came out a bit more like a splodge!) and pipe crosses on to the buns when they are proved.
8. Bake for 20 -25 minutes til golden brown and sound hollow when tapped. Glaze with honey when they come out of the oven and leave to cool.

I learnt a good tip from Paul Hollywood on his Bread programme, bread should be left to cool when it is finished baking, so that the inside cooks with the residual heat - something which explains the doughy insides I have been suffering with! I did this with the hot cross buns, for as long as I could, and they came out perfect inside.

Enjoy spread with butter and a large cup of tea.


Pin It

Tuesday, 26 February 2013

Chai Masala Biscuits


Whilst making a cup of masala chai the other week I was thinking what a good idea it would be to put some of the masala into a batch of biscuit/cookie dough. I've made spiced cookies before, with a bit of ginger or cinnamon, and the punchy chai masala would probably work just as well. And I am pleased to say it did!

The masala mix is made up of cardamom, cinnamon, cloves, black pepper, ground ginger and nutmeg, I bought some back from India, you can either buy some from your nearest Indian supermarket, grind your own or use the individual spices in the cookie mix. Some larger Tesco stores might even stock it now too.

I used a basic cookie dough from BBC Good Food, which if you read my blog regularly you'll know is a site I use a lot, there are tons of recipes on there and their baking section contains lots of classic recipes - basic sponges, shortcrust pastry, fruit cakes, mince pies. Good stuff.

The biscuits are quite like shortbread, and the masala gives a nice little warmth. If you are a hardcore dunker (well done) I would suggest making them 1.5cm thick instead of 1cm as below.

Chai Masala Biscuits
adapted from BBC Good Food

Makes about 30 cookies, maybe more.I froze half the dough (wrapped in cling film and then put in a sandwich bag), my standard behaviour when making biscuits or cookies - so that I have a stash for when I really crave them.

250g softened unsalted butter
140g sugar
1 egg yolk
2 tsp of vanilla extract
295g plain flour (plus extra for dusting)
5g chai masala or mixed spices

Optional:
50g chocolate melted with 5g butter (to keep it shiny) for dipping
Extra sugar and chai masala for sprinkling on before baking / onto the chocolate

Preheat your oven to Gas Mark 5 / Fan 180 / Electric 190 
Cream together your butter and sugar til combined well and nice and fluffy.
Add in the egg yolk and the vanilla extract and mix in well.
Sift in your flour and masala, mix in - you'll need to get in with your hands here and knead to a dough. 
Add a tiny bit of water at a time if it seems a little dry.
Knead very briefly to a soft dough, wrap in cling film and chill for 20 minutes.

Roll out to about 1cm thick and cut into whatever shape you fancy, with a knife or cutters.
Lay on a baking tray lined with greaseproof paper. You can put them reasonably close together as they don't spread too much during baking.
Sprinkling the biscuits with a little chai masala mixed with sugar before baking gives a nice crunch when they are baked.

Bake for 10 - 12 minutes in the centre of the oven.
They can go from not cooked to brown in 30 seconds so keep an eye during the first batch, your oven may behave differently. 

Cool on a wire rack, you can either now eat them or dip them in melted chocolate and leave to set. 
I couldn't stop fiddling around with them and sprinkled the unset chocolate with a little chai sugar for extra spiciness.

Pin It

Wednesday, 21 November 2012

Herman Friendship Cake


If you google Herman Friendship Cake it is basically all over the internet, there is even a whole website dedicated to it.  Basically it is a sweet sourdough starter used to make cake, you divide it into 5 portions - make a cake with 1 and distribute the rest to 4 lucky friends. I'd heard of it a while ago and a couple of weeks ago I got my hands on a bubbling pot of Herman starter from Vanessa.

I fed it with milk, sugar and flour, stirred it (not with a metal spoon, very important) and it stunk out the kitchen with yeasty smells for about a week. I've tried sourdough before, and whilst it was successful soon my starter started to smell of paint and it didn't make good bread anymore, so in the bin it went. Maybe my kitchen has the wrong atmosphere?


I wasn't intending on keeping this starter or passing it on as you are meant to (what can I say, I am greedy) - mainly because I'd never remember to feed this little floury pet every few days for the forseeable future. So about 1/3 went into a Herman friendship cake and the rest into a semi-sweet sourdough loaf (which actually didn't come out too well but let's not talk about that...).

I used this recipe here but substituted the oil for cooled melted butter, because you know, butter is better in a cake. I also added four chopped pink lady apples (and a few sliced up on the top) and a generous amount of vanilla extract. The resulting cake is very proper looking - homey, HUGE with a lovely crispy top. Had I had got around to making custard, I'd say it would be great with custard.

The cake has a yeasty taste which isn't as odd as it seems, to me it tastes a bit like a chelsea bun  - which is why I expect the original recipe contains raisins, I think some nuts would be great too.

I now kind of wish I'd saved the starter for more cake, I'll just have to make more friends with Hermans!


Pin It

Tuesday, 24 April 2012

Oat & Peanut Butter Sandwich Cookies


I think this recipe is the fastest read to bake ratio on the blog yet. Joy the Baker blogged this lovely recipe on Thursday and I was in the kitchen making them on Sunday. I think I would have been quicker had my car not broken down on Friday (I'll save moaning about that for my Twitter account!).

I've been searching out the Peanut Butter Co. peanut butter for a while. They are based in New York and make natural peanut butter without all the scary preservatives and palm oil that most producers use (even brands made in the UK which doesn't use as much palm oil as the States).
Sainsbury's stocks the smooth peanut butter, they have lots of different flavours (cinnamon raisin swirl! dark chocolate dreams!) so I am hoping they get more popular here and start stocking more.


These cookies are so great, I always have success making oaty cookies and these were no exception. They have tons of flavour, lots of crunch from hazelnuts and that amazing peanut butter filling. I used a touch less sugar in both the cookie mixture (2/3 cup) and added icing sugar to taste, I don't like cookies too sweet as I like to taste the rest of the ingredients.

I made up the whole batch of dough according to the recipe, but only baked half, I saved the rest and froze them in little balls in the freezer - ready for future cookie cravings! I do this a lot with cookies as we can't eat such big batches ourselves, and it is nice having cookie dough in the freezer. I made half the icing for my half batch of cookies.

Oatmeal & Peanut Butter filled Sandwich Cookies
From Joy The Baker, makes about 24 cookies.
100g / 4oz unsalted butter, softened
2/3 cup of brown sugar
1 large egg
1 teaspoon of vanilla extract
1 1/4 cups of porridge oats
1 cup of plain flour
1 1/2 teaspoon of baking powder
1/2 teaspoon of salt
1/2 teaspoon of cinnamon
few grinds of black pepper (Mr doesn't like nutmeg so I gave this a go and it worked!)
1/2 cup of chopped hazelnuts

Peanut Butter Filling (this is the whole batch, half if you are freezer stashing your dough!)
3 tablespoons of butter, softened
1/2 cup of good quality smooth peanut butter
1 cup of icing sugar
1 teaspoon of vanilla extract
3/4 tablespoons of milk

Preheat the oven to gas mark 4 / 180c.

Cream the butter and sugar in a large bowl or mixer, add in the egg and mix to combine, add in the vanilla extract and combine.

Mix the oats, flour, baking powder, salt and spices in a separate bowl. Then adding a bit at a time fold in the dry ingredients with the butter mixture. Be careful not to overmix. When it is all incorporated stir in the nuts.

Prepare a flat baking sheet by lining it with baking parchment. Scoop out teaspoon size bits of dough, roll into a ball and place on the sheet 1.5 inches apart. Bake for 10 minutes for soft chewy cookies and 13 minutes for crispier cookies. Bake in batches if you don't have room.

For the filling:
Put the butter, peanut butter and vanilla in a bowl and cream together. Add the icing sugar in batches. I added in half first and mixed, tasted for sweetness and added more to taste. To get a creamier icing that is spreadable add in splashes of milk to the icing.

When the cookies are cool enough (leave in the tray for 5 minutes and then cool on a wire rack for 10 - 15 minutes) spread the icing over each underside of the cookie and then sandwich. Place in mouth. Place another one in your mouth. Make a cup of tea and dunk that cookie in it!

I'm really quite smug that I have another 12 cookies to be in my freezer.

Pin It

Tuesday, 17 April 2012

Rhubarb & Banana Muffins - dairy free


I'm pretty sure all banana cake recipes come about because of a bunch of bananas slowly going off in your fruit bowl, that is the only reason I've ever made a banana cake anyway. These muffins were born out of a bunch of unripe bananas, a lot of rhubarb and a desire to have something vaguely healthy to grab for breakfast.

I had no eggs in and no butter in so I experimented and created these muffins which are happily very yummy and also vegan too!


Rhubarb & Banana Muffins
makes 12 muffins

4 very ripe bananas
1/3 cup of flavourless oil (groundnut, sunflower)
3/4 cup of caster sugar
pinch salt
1 tsp of vanilla extract
1 1/2 cups of self raising flour
3 sticks of rhubarb, chopped into small pieces
extra sugar for sprinkling
oats for sprinkling - optional


Preheat your oven to 190c / gas mark 5.

Mash your bananas in a large bowl and then add in your sugar, oil, salt and vanilla. Mix together. Then sift in your flour and fold in, try not to work the mixture too much otherwise the muffins will be tough and dry.

Prepare your muffin tin with cases. Put about a tablespoon of the mixture into each case and then put a couple of pieces of the rhubarb on top of that. Sprinkle with a little sugar. Top with more mixture, fill right to the top. Put another piece or two or rhubarb on the top of each cake, sprinkle with some more sugar and then some oats.

Bake for 12 - 15 minutes until cooked through and golden brown.


I would say these are vaguely healthy enough to be ok to eat for breakfast, I think they'd be lovely with yoghurt.

Pin It

Monday, 9 April 2012

Pesto Pull Apart Bread


This Pesto Pull Apart Bread is a real crowd pleaser, I think tearing big chunks of freshly baked bread slathered in pesto is just about anyones favourite thing to do. I took this bread along to The Secluded Tea Party Unbirthday this weekend as part of the pot luck spread, along with some sundried tomato palmiers (more on that soon). It looks kind of awesome, all big and gnarly on the table and tastes even more awesome.

This bread takes time time to make but if you are confident enough making a normal bread dough then you'll be fine here. It is quite a nice bank holiday activity, something you potter in and out of the kitchen at regular intervals to do the necessary stages.

I've seen this as a sweet filling before too, filled with cinnamon sugar, and also in other savoury ways - sun dried tomato, cheddar & mustard. 

Pesto Pull Apart Bread
based on the recipe from Miss Igs

For the dough
1 cup of warm water
1 packet (7g) of fast action yeast
2 tablespoons of olive oil
2 cups of strong white bread flour
2 tablespoon of sugar
1 teaspoon salt
1 egg

For the pesto
Large handful of fresh basil
2 cloves of garlic
1/4 cup of toasted pine nuts (toasted in a dry pan)
approx 1/8 cup of grated parmesan or hard cheese
extra virgin olive oil

Mix together the warm water, yeast and oil in a large bowl. Leave for 5 minutes til the yeast starts to bubble.
Then add the bread flour, sugar and salt to the yeast mixture. Mix well with a wooden spoon (or a mixer if you have one, I have one on my wish list!) until all incorporated in to a dough, add the egg in and mix to incorporate again. Your dough might be a bit wet here so add in some more flour to form into more of a kneadable dough. Knead lightly in the bowl for just a couple of minutes. You'll not need to worry so much about kneading if you are using a mixer with a dough hook.


Cover the bowl with a tea towel and leave in a warm, dry place for at least an hour to prove. It should double in size.
You need to make your pesto now. Just blitz all the ingredients in a food processor or mini blender. Add some oil to begin with and then add more as you need to loosen the mixture.

After proving knock back the dough, flour a board well and roll out thinly in a rough rounded square. Spread the pesto over the dough.

Cut the dough into 4 long strips. Then pile the strips on top of each other, then cut into little square stacks. Then stack the little squares into a oiled and floured loaf tin. Leave to prove for another 30-40 minutes.

Preheat your oven to 170c / gas mark 3. When it is proved bake in the oven for 30 - 35 minutes until golden brown and cooked through. Keep an eye on it in case it starts to brown too much, you may need to turn your oven down, mine went quite brown in the end.


Remove from the tin about 5 minutes after it has come out of the oven. Cool on a wire rack. Tear into it when it is still slightly warm / as long as you can bear without eating it.


Pin It

Wednesday, 7 March 2012

Gujarati Recipe Series - Handvo, Savoury Cake


This post marks the first in my series of Gujarati recipes! This is something I've been meaning to start for a long time and I have been encouraged by many of my twitter followers to do so too. I think it is pretty fitting to start off with a cake, but this time a savoury, spicy vegetable cake.

Handvo, or Andvo, is made from chickpea and semolina flour with carrots, peas, onion and sweetcorn, chili and ginger inside with a crispy top with mustard seeds on top. We always used to eat this on Saturday nights, with other snacky food like samosas - although it is a pretty filling meal in its own right.


Handvo
Makes one 18 x 6 cm dish (though will work in slightly bigger or smaller dishes)
You need to start this the day before you want to eat it. 
My cups are American cups, teacups also work well.

Part 1 - the day before
Ingredients
1 cup of coarse semolina flour
1 cup of chickpea (gram) flour
1 tsp of grated fresh ginger
1 - 2 green chillies (to taste)
1 tsp salt
2 tsp sugar
1 cup of natural yoghurt (my Mum said the cheaper the better as you want a nice tangy yoghurt!)
2 tbsp of groundnut, sunflower or mild olive oil
warm water - about 1/2 - 1 cup

Mix together all the ingredients except the water, add the water gradually to loosen the mixture til it is the texture of cake batter. Cover and leave in the fridge overnight (or up to 24 hours) when you want to use it remove from the fridge and bring to room temperature.

Part 2 - the next day
Ingredients
1 1/2 tsp of baking powder 
1 medium onion, diced
2 tbsp of frozen peas
2 tbsp of frozen or fresh sweetcorn
1 medium carrot, finely diced

Add all of the vegetables to the 'cake' mixture plus the baking powder, stir briefly (don't overwork the mix) to combine. Preheat your oven to 180c / gas mark 4. Grease and line your dish and pour in the mixture.

Mustard Topping
1 tsp of black mustard seeds (the yellow ones don't really work as well, try your local asian grocer or health food shop for black mustard seeds)
3 tbsp of groundnut, sunflower or mild olive oil

With your mixture ready in your dish and your oven heated up. Heat the oil in a high sided saucepan on a med/high hob. Put in the mustard seeds and quickly cover the saucepan with a lid. Allow the mustard seeds to pop for about 30 seconds. Turn off and remove from the heat and allow it to cool for about 1 minute. Then pour the oil and mustard seed mixture over the cake mixture in the dish.

Bake for 45 mins - 1 hour in your preheated oven. You want the top to be quite brown, possibly looking a little overdone (I erred on the side of caution here so mine is a bit paler than it should be). 

Handvo is supposed to be served hot so slice up as soon as it comes out of the oven, it is best served with a dollop of good old tomato ketchup! It is also great cold the next day

Am hoping to return soon with more Gujarati recipes, I've got lots of things I'd like to make next. I hope you might make this, its a great recipe to try if you like baking cakes.


Pin It