Showing posts with label mince pies. Show all posts
Thursday, 13 December 2012
Mince Pies : 5 Top Tips
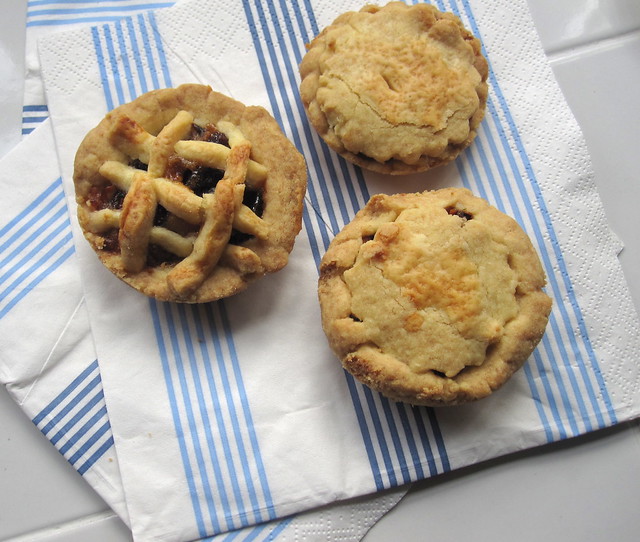
I am currently basking in the glory of having made a near perfect batch of mince pies*, so I thought I'd share with you some tips for making them. I blogged the recipe I use last year and the pastry is yet to fail me, which is saying something if you know about my pastry history before that.
1) Make or buy a jar of really good mincemeat
My Mother-in-Law very kindly gives me a jar or two of her homemade mincemeat once a year, which is excellent. If you can, make your own but if don't it is worth buying a good quality homemade mincemeat - farm shops, delis and local farmers markets have lots of choice. Supermarket mincemeat tends to be full of too much sugar, which means the sugar caramelises in the oven and bubbles over the sides of your pies. And it also makes the pies stick to your tin if you are particularly unlucky.
2) Grate your butter, don't dice.
This tip works for all pastry and also for crumble, it is so simple but it makes making pastry ten times easier, and keeps the butter cold. Freeze your butter beforehand if you can too as it makes it easier to grate. Another tip I picked up, which was from Mary Berry, is coating the butter in flour makes it easier to grate without getting in a big mess.
3) Thin pastry is better
It makes sense, a big thick lining of pastry is going to take ages to cook and you'll end up with claggy horrible mince pies. A nice thin layer of pastry, about 3-4mm is best for mince pies - that way your mince pies will stay crisp and will bake in 15 minutes.
4) CHILL
It is really important to chill your pastry after you've made it so that it doesn't shrink up or go all melty in the oven. The pastry recipe I use also doesn't contain any liquid but if you find it takes a while to come together a bit of ice cold water won't hurt, but it helps if you chill your pastry down for a bit longer to counteract shrinking/melty pastry. After filling and topping my mince pies I also give them another 15 minutes in the fridge for the same reason.
5) Don't use too much mincemeat
I'm starting to sound a bit mean now, aren't I? It's ok, you can just eat two instead of one. A scant teaspoon of mincemeat is enough, otherwise you'll have mincemeat bubbling over the edges of your pastry and your mince pies will burn on top and probably stick to the tin.
So there you are, happy mince pie making! I made a double batch of dough and the second half is waiting for me in the freezer so I'll be making another batch this weekend.
Merry Christmas!
* They lose marks for not being too pretty, but if it tastes good, who cares?
Labels:
christmas,
mince pies,
pastry,
shortcrust,
tips,
tricks,
xmas
Monday, 13 December 2010
Easy Peasy Mince Pies
I love homemade mince pies, shop bought ones are always disappointing, too much filling and horrible dry pastry. Mince pies are also very satisfying to make, they seem like a big achievement but they can be really easy.
I was given a jar of homemade mincemeat which went into these pies, it was much lovelier than shop bought - not too sweet, boozy and well spiced.
The pastry contains no liquid, just butter, flour and sugar. A lot of butter, which is what makes it stick together. The resulting pastry case is very close to shortbread but crisper and sweeter. I think these took me just over an hour to make, most of the time was spent because I had to bake in two batches.
They are not the prettiest mince pies ever, not neat but what I like to call 'rustic'. They taste brilliant though, which is what matters!
I played around with the mincemeat, the first batch had pure mincemeat but the second I added some chopped hazlenuts and grated apple (spotted that tip on Kirstie and Phil's Christmas) which added lovely texture and also meant I could eke out the mincemeat more.
Makes approximately 16 - 18 mince pies
adapted from BBC Good Food
225g very cold butter
350g plain flour
100g granulated or caster sugar
1 jar (about 300g) mincemeat
egg or milk to brush over tops
Add your flour to a large mixing bowl, then grate in all of your butter. Grating cold butter means that you have finer strands in your flour which allows you to incorporate it better. Rub into the flour til you have a texture like fine crumble. Mix in your sugar and start to knead into a dough, the butter will be warmer now and so you will be able to work into a dough. Try not to add any liquid as your pastry will shrink in the oven later on.
Once it starts to form knead briefly and it is ready to use.
Preaheat oven to 200c (180c fan) or gas mark 6.
Lightly grease a nonstick cup tin, you don't have to but I wasn't going to trust my tin entirely after last year!
To form the bottoms you can either form walnut sized pieces of dough, flatten and then spread out into each cup to form a base. Or you can roll out the dough carefully (using plenty of flour) and use pastry cutters. I found the pastry cutters a better method although a little more time consuming. Form tops using pastry cutters or small sized balls squashed out.
You can also go for a lattice effect (which may look neater than mine, I am sure) or top with chopped nuts - both of which are delicious.
Brush the tops with beaten egg or milk, bake for 20 minutes til golden brown.
Leave to cool for 5-10 minutes before taking them out of the tins.
Subscribe to:
Posts (Atom)