I love tea time and afternoon tea themed goodies, these would be perfect for any tea lover!
L-R
Tea Time print by Anek
Wild Blueberry Preserve by Wee Bee Jammin
Art Journal for Tea Lovers by Buechertiger
Eat Me Alice in Wonderland Tags by vintagetwee
Monday, 31 May 2010
Thursday, 27 May 2010
Simple Shapes
I've been working with a lot of pearls recently, some lovely intricate mother of pearl and some beautiful vibrant lampwork. I sat down to my desk yesterday and made a whole bunch of really simple shapes for some everyday designs.
I like metalsmithing because it allows me to completely handcraft a piece of jewellery and use simple shapes to beautiful effects. The first piece of jewellery I made yesterday was these gold fill earrings. I intended to add some sparkly smoky quartz (yes I'm going into gemstones!) but they looked just as good as they were.
I'm keeping the first pair for myself, they are perfect for everyday wear and the warm colour goes with lots of different things.
These earrings are in my Etsy shop to buy.
More new and simple shapes coming this week, in silver and copper. Watch this space!
xx
Tuesday, 25 May 2010
weekend
We did what pretty much half the country did on Saturday - lots and lots of gardening followed by cider, beer and barbecue food.
I am hoping for a good harvest this year, the fruit trees are looking well too!
Friday, 21 May 2010
Free Shipping!
Just popping into say I have Free Worldwide Shipping in my Etsy shop this weekend (Fri-Mon).
I've been a bit quiet on the blog but I'll be back with some recipes next week.
Hope everyone has a lovely weekend in the sun!
xx
Tuesday, 18 May 2010
Cooking - Ricotta Gnocchi & Sundried Tomato Pesto
I'm a big fan of gnocchi, but I don't have it often enough, mainly because I've always made it with potatoes which is a far more labourious process. This ricotta version does still require a little effort but is less time consuming, from this you get a light and creamy pasta with less heartache from boiling and cooling potatoes.
Gnocchi refers to the shape of the pasta rather than what it is made from - gnocchi is the plural of gnocco, which means 'lump' in italian - so they refer more to little dumplings rather than a specific ingredient.
This gnocchi can be served with any of your favourite sauces - a simple tomato, basil pesto, a cream sauce or sage butter. My new favourite is sundried tomato pesto, it is a great sauce because you can bring it together with storecupboard ingredients and a touch of parmesan.
I made do with normal supermarket ricotta here but if you can find something great from a deli or your local farm shop it will taste even better.
Serves 2
To make the Gnocchi
250g tub of ricotta
150g - 200g 00 pasta flour or plain white flour
1 egg yolk
1 tablespoon parmesan or pecorino
salt and pepper
First you need to drain your ricotta, put it in a fine sieve over a bowl and leave for half an hour for any residual water to drip through.
Once your ricotta is ready add it to a large bowl with the egg yolk and seasoning, then your pecorino or parmesan. Stir to combine, then slowly add your flour in a few tablespoons at a time until you have a workable but slightly sticky dough. Make sure to add your flour in slowly so you can keep an eye on the consistency.
Cut your dough into little 1 inch pieces. Transfer to a well floured plate or tray and refridgerate for at least 1 hour. If you want to freeze your gnocchi to use later, lay out on a baking sheet and freeze, then transfer them to a freezer bag. Defrost fully before cooking.
To cook your gnocchi, add to a pan of simmering water and cook for 1 - 2 minutes until the gnocchi float to the top.
Remove with a slotted spoon as each one rises to the surface. If you are making the pesto below save a few tablespoons of the cooking water.
For extra texture you can fry your gnocchi after this step. Add oil to a nonstick pan and fry on a high heat for 1 - 2 minutes on each side until golden brown. This step is great because you get a crisp outside and a melty middle.
4 -5 sundried tomatoes
clove of garlic
about 10 pine nuts
2 tablespoons parmesan or pecorino
olive oil
small bunch of basil - optional
salt and pepper
Blitz all your ingredients in a food processor until blended. Add more oil if it seems a little thick. This pesto is a little drier than basil pesto, you can use the saved cooking water from your pasta to make it more like a sauce.
To serve with your gnocchi very gentle toss the sauce with the hot gnocchi in a saucepan, being careful not to break up the gnocchi pieces.
Serve in warmed bowls with parmesan on top, we had ours with some garlic rubbed ciabatta too.
Friday, 14 May 2010
Weddings at Lazy Giraffe Jewellery
Wedding season is fast approaching, Christmas only seemed like yesterday.
I've been designing lots of new jewellery with brides and bridesmaids in mind.
Fairy Tale Earrings - mother of pearl and vintage glass
Classic Pearl Necklace - Swarovski and sterling silver
I've been designing lots of new jewellery with brides and bridesmaids in mind.


I am taking custom orders for spring and summer brides, just contact me for multiples of any design or a custom piece.
Thursday, 13 May 2010
Cooking - Bacon Brownies

Go with me on this one.
It is good, I promise.
And you know I wouldn't lie to you..

This recipe has been on my list for a while, I spotted it over on 
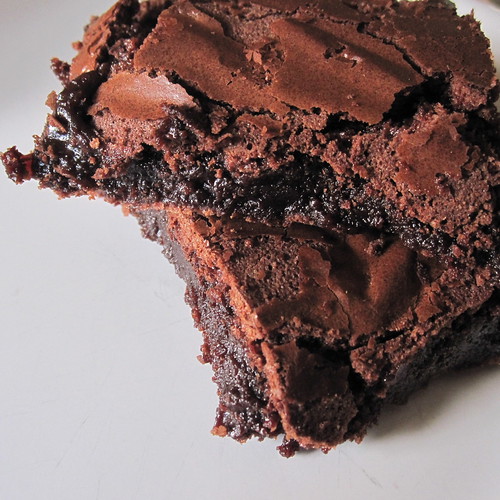
17 and Baking and it totally made sense to me. Rich dark chocolate and smoky bacon with a hint of saltiness - and we all know the food world is crazy about salt and sweet right now (salted caramel anyone?).

It is not miles away from the classic bacon and maple syrup combination, you get a nice hit of sweet and a nice hit of salt, but with the brownies you get the dense dark chocolate too.
I make brownies quite often, I have one recipe which I like to stick to but I've been keen to try new ones, the best thing about brownies is that there are so many great recipes out there offering something different but also still giving you that quintessential brownie - gooey and crispy.
This recipe obviously offers something completely different!
It did feel very weird putting bacon into a brownie mix but I stuck with it and I was not disappointed.Try to use the best quality streaky bacon or pancetta you can find, anything cheap will leach out too much water and your brownies won't be good. It should also be smoked. I used good quality smoked pancetta, this crisps up well and won't be filled with water.
Bacon Brownies
makes approx 12 brownies
4 rashers of good quality streaky bacon or pancetta
50g / 2oz dark chocolate (at least 70%), chopped
4 tablespoons good quality cocoa
100g / 40z butter2 teaspoons vanilla extract
2 eggs
100g plain flour
1 teaspoon of baking powder
150g caster sugar

Heat your oven to gas mark 5 / 375f / 190c.Heat up a frying pan on the hob, once hot add your strips of bacon. Fry on each side for a couple of minutes or until nice and crispy. Transfer to paper towels to crisp up further and drain the fat.
Once the bacon is cool cut or tear up into small pieces, about 1cm wide.
Put the chocolate, cocoa and butter in a heatproof glass bowl and heat gently over a pan of simmering water. Stir frequently until everything is melted and combined. Remove from the heat and allow to cool for a few minutes.
Whisk in the sugar and vanilla, then add in your eggs one by one, stir to combine.
Sift in the flour and baking powder and then stir in the bacon.
Add to a grease and lined cake tin or square cake tin (better for brownies, I need to buy one!).

Bake for 30 - 40 minutes on the middle shelf. Your brownies are done when a skewer or knife comes out clean when inserted. Remove from the pan and leave on a board or wire rack.
Let them cool completely (sneak a crispy corner if you can't wait!) before cutting into squares.
Store in the fridge, bring back to room temperature to eat.
I had mine with a nice strong coffee, this motivated me for the rest of the afternoon!
Serve to friends (not vegetarians though!!) and don't tell them what is inside, let them guess - I bet they won't know!

Subscribe to:
Posts (Atom)